xTend for Windows

Getting Started 

1. Introduction

1.1. Purpose of This Guide

This guide provides an overview of xTend software along with the installation, configuration, and usage of xTend software.

1.2. What is xTend?

Introducing Ennetix xTend, the next level of observability for Windows users. This ground-breaking tool provides unparalleled visibility into the covert activities taking place in your system. With xTend, you can finally peel back the layers of your Windows computer operations to see what’s really happening underneath.

1.3. Supported Windows Versions

Windows 10 and later versions.

2. Installation

2.1. System Requirements

No special system requirements other than supported Windows versions.

2.2. Downloading the Installer

Please download xTend for Windows by using the following link: xTend Installer.

2.3. Installation Process

To install Windows xTend, double-click the MSI file and follow the prompts, agreeing to the terms and conditions to proceed.

2.3.1. Configuring Audit Policies

During the installation, xTend sets up specific audit policies, enabling the collection of valuable audit data:

Audit Process Creation with Command Line Arguments: This policy enables the collection of data on process creation.

Audit Filtering Platform Connection: This enables network connection data collection.

Note: In the Local Security Policy app, these audit policies might appear as “non-configured,” though they are correctly set up by xTend.

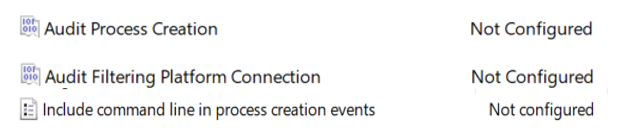
Fig 2: Audit Policies set by xTend.

3. Running xTend

3.1. Starting the Service

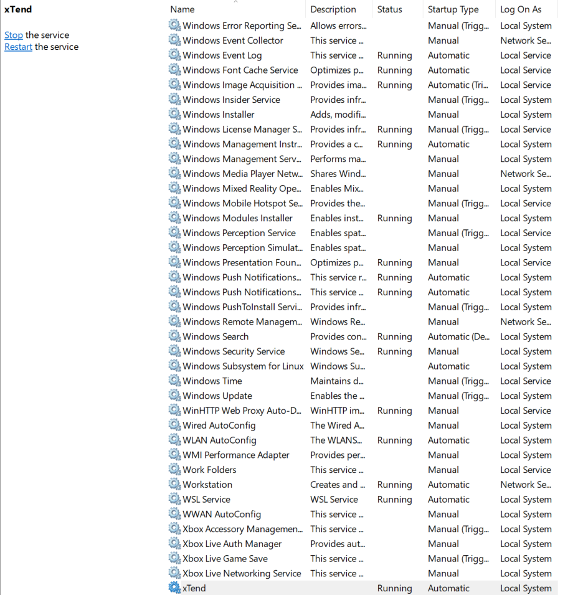
Once installed, xTend runs as a service, which is visible within the Windows Services application. Here, you can start, stop, or pause xTend. It is configured to automatically run at startup, continuing until it is stopped, or the computer is shut down. The application begins collecting audit data immediately after installation.

Fig 3: How xTend looks in the Service Window.

3.2. Using the Service Window for Management

To restart the service, you can use the Services window or the Command Prompt via sc.exe CLI commands. For a desktop shortcut method, ensure that you run it as an administrator.

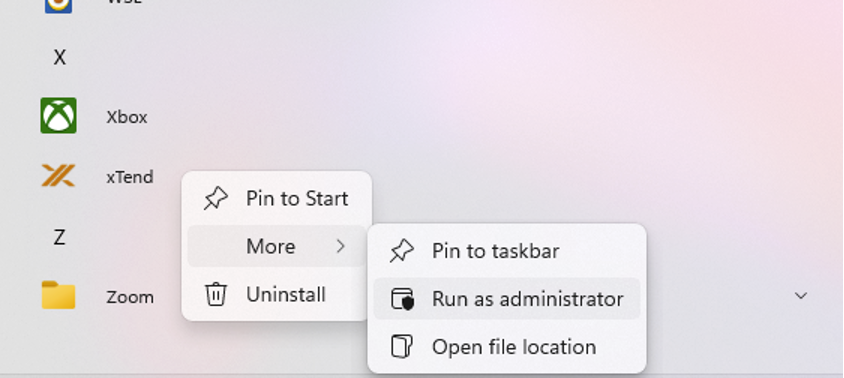
Fig 4: Running xTend with Shortcut.

4. Accessing xTend Logs

4.1. Accessing and Managing Logs

The xTend data can be stored in different places; but by default, you will find the xTend data in the folder called “logs” where xTend was installed. Logs are constantly written to event_logging.json and rolled over to event_<timestamp>.json. In this directory, you will have files that contain both process-creation logs and network-connection logs.

4.2. Understanding the Log Files

The log files will contain both process creation and network connection logs that describe the system activities on the device where xTend is running.

Common data in the logs will contain the following information:

@timestamp: When the event took place.

count: The count of logs after aggregation.

ecs[version]: The Elastic Common Schema (ECS) version.

host[hostname]: The name of the host.

host[ip]: The host IP.

host[os][type]: The OS type, usually Windows.

host[os][version]: The OS version.

host[labels][xomeId]: The id of the xTend, usually 0 for the personal version of xTend.

message: The type of event.

tags: The version of xTend.

4.3. Process Creation Logs

The following fields describe the process-creation logs that are specific to a process-creation event:

process[args]: The list of arguments the process was run with.

process[args_count]: The number of arguments of the process.

process[executable]: The executable path.

process[pid]: The ID of the process.

process[parent][executable]: The parent executable path.

process[parent][pid]: The ID for the parent process.

user[name]: The user that the process event happened on.

parent_processes: All parent processes of the process.

Following is an example line that you would see in a log file for a process-creation event:

{"@timestamp":"2024-04-30T19:27:45Z", "count":1,"ecs":{"version":"8.11.0"}, "host":{"hostname":"EN-Joe", "ip":"192.168.1.128", "os":{"type":"windows", "version":"6.1.0-18-amd64"}}, "labels":{"xomeId":0}, "message":"Provenance_Data", "parent_processes":[{"exectuable":"code","pid":3348193}], "process":{"args":["args"], "args_count":1, "executable":"/usr/bin/docker", "parent":{"executable":"code", "pid":3348193}, "pid":3775437}, "tags":["0.0.0"], "user":{"name":"joe"}}
4.4. Network Connection Logs

Network connection event logs will contain the following information:

destination[ip]: Destination IP for a network connection (May be omitted for aggregated data).

destination[port]: Destination port for a network connection.

source[ip]: Source IP of a network connection.

source[port]: Source port of the network connection (May be omitted for aggregated data).

network[application]: The application that created the network connection (will be empty if no application created the connection).

network[direction]: Whether the network connection is inbound or outbound.

network[transport]: The transport protocol of the network connection.

process[pid]: The ID of the process that created the network connection (will be 0 if no application created the connection).

Following is an example line you would see in a log file for a network-creation event:

{"@timestamp":"2024-04-30T19:27:46Z", "count":1, "destination":{"ip":"1.1.1.1", "port":0}, "ecs":{"version":"8.11.0"}, "host":{"hostname":"EN-Debian-Joe", "ip":"2.8.1.8", "os":{"type":" windows", "version":"6.1.0-18-amd64"}}, "labels":{"xomeId":0}, "message":"Network_Connection","network":{"application":"DNS Res~er #705", "direction":"outbound", "transport":"udp"}, "process":{"pid":73170}, "source":{"ip":"2.8.1.8", "port":55244}, "tags":["0.0.0"]}
6.5. Viewing xTend Logs (Personal Edition)

5. xTend Configuration (Personal Edition)

5.1. Overview of the Configuration File

xTend includes a single configuration file “config.json” to manage all its services. Some of the services in xTend (personal edition) are: OS, Aggregation, and Provenance. It is important to note that users of the personal edition of xTend do not need to configure anything. Default configurations will work automatically. But, for curious users, a sample configuration file will be in the following format:

{
  "os" : {
    "exporter" : {
      "type": "socket",
      "args": {
        "port": 11427
      }
    }
  },
  "aggregation" : {
    "additional_config": {
      "aggregation_time": 0.1
    },
    "listener" : {
      "type": "socket",
      "args": {
        "port": 11428
      }
    },
    "exporter" : {
      "type": "logging",
      "args": {
        "maxSizeKB" : 64,
        "maxLogFiles" : 4,
        "fileDirectory" : "../logs",
        "fileExtension" : "json" 
      }
    }
  },
  "provenance" : {
    "listener" : {
      "type": "socket",
      "args": {
        "port": 11427
      }
    },
    "exporter" : {
      "type": "socket",
      "args": {
        "port": 11428
      }
    }
  }

5.2. Understanding Configuration Options

Each section of the configuration file represents a single xTend service which must contain a listener and exporter object except for OS which contains an exporter. By default, xTend is configured so that the OS service exports to the Provenance service’s listener via a socket on port 11427 which similarly exports to Aggregation on port 11428. If the configuration file is changed, the application should be restarted so that the configuration can be reapplied to xTend. Below, details on the types of supported listeners and exporters and configurations of each of these options are provided.

5.2.1. Listener Settings

The “listener” object in the configuration is used for the Aggregation and Provenance services and not the OS service. The “listener” object can use the following configurations:

1. File Overwrite: Reading data from a file.

{
  "listener": {
    "type": "file_overwrite",
    "args": {
       "filename": "filename"
    }
}

Note: The filename is a path relative to the executable.

2. Socket: Read data from a socket.

{
  "listener": {
    "type": "socket",
     "args": {
      "port": 1123
     }
  }
}

Note: If the port is in use, the program will not run; the default port used is 11427.

5.2.2. Exporter Settings

The “exporter” object in the configuration is used for all xTend services. The “exporter” object can use the following configurations:

1. Socket: Write data to a UDP Socket.

{
   "listener": {
     "type": "socket",
      "args": {
         "port": 1123
     }
   }
}

Note: If the specified port is in use, the program will not run; current default port used is 11427.

2. File Stream: Continuously write to a file in a folder without rotating (file grows infinitely).

{
  "exporter": {
    "type": "file_stream",
    "args": {
      "folderPath": "folderPath"
    }
  }
}

Note: Keep this in mind that “folderPath” and “filename” serve different roles. The “folderPath” points to a specific location for saving the file, which then gets automatically assigned its name.

3. Rotating Logs: Continuously write to a file in the folder with rotating logs (logs rotated when one file reaches a certain size).

{
    "exporter" : {
      "type": "logging",
      "args": {
        "maxSizeKB" : 64,
        "maxLogFiles" : 4,
        "fileDirectory" : "../logs",
        "fileExtension" : "json" 
      }
    }
  }

Note: “maxSizeKB” is in KB and “maxLogFiles” will produce 1 + maxLogFiles number of files where one file is where data is initially written to before rotating.

5.2.3. Additional Settings

The “additional_config” object in the configuration contains additional options and adjustments for the Services. Currently, this object is used for only the Aggregation config section. The object determines how long the application aggregated data for before logging the aggregated data. The “additional_config” object is in the following format:

{
    "additional_config": {
    "aggregation_time": 0.1
}

Note: The aggregation time is in seconds.

6. Restarting xTend (Personal Edition)

There are two methods to restart xTend (personal edition). One method is through the Windows Services app and the other option is through the Command Prompt with administrative privileges.

6.1. Through Windows Services

Make sure that the xTend service is running, and click on the xTend service.

Click Restart in the left panel of the list.

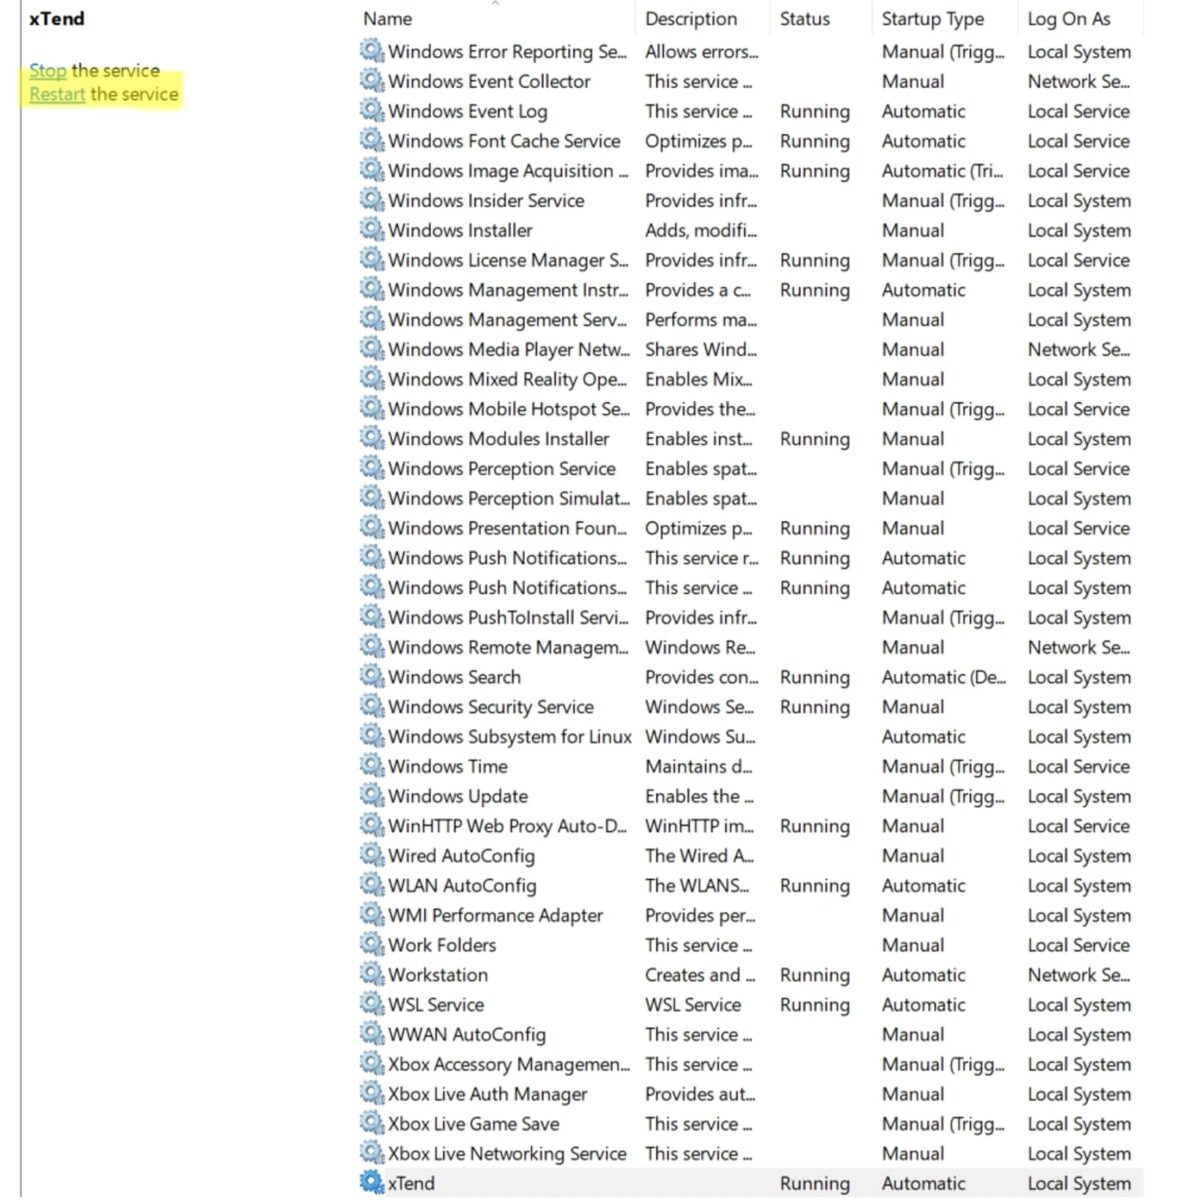
Make sure that xTend is running.

6.2. Using the Command Prompt

Stop the service through the command: sc.exe stopX “xTend”.

Start the service again through the command: sc.exe start “xTend”.

Check the service is running through the command: sc.exe query “xTend”.

7. xTend Configuration (Enterprise Edition)

7.1. Overview of the Configuration File

xTend includes a single configuration file “config.json” to manage all its services. Some of the services in xTend (enterprise edition) are: OS, Aggregation, Provenance, and Sigma. It is important to note that xTend with the default configuration will work automatically. But, for advanced users, a sample configuration file will be in the following format:

{
  "os" : {
    "exporter" : {
      "type": "socket",
      "args": {
        "port": 11427
      }
    }
  },
  "aggregation" : {
    "additional_config": {
      "aggregation_time": 0.1
    },
    "listener" : {
      "type": "socket",
      "args": {
        "port": 11428
      }
    },
    "exporter" : {
      "type": "logging",
      "args": {
        "maxSizeKB" : 64,
        "maxLogFiles" : 4,
        "fileDirectory" : "../logs",
        "fileExtension" : "json" 
      }
    }
  },
  "provenance" : {
    "listener" : {
      "type": "socket",
      "args": {
        "port": 11427
      }
    },
    "exporter" : {
      "type": "socket",
      "args": {
        "port": 11428
      }
    }
  },
  "sigma" : {
    "listener" : {
      "type": "socket",
      "args": {
        "port": 11428
      }
    },
    "exporter" : {
      "type": "logging",
      "args": {
        "maxSizeKB" : 64,
        "maxLogFiles" : 4,
        "fileDirectory" : "../sigmalogs",
        "fileExtension" : "json" 
      }
    }
  }
}
7.2. Understanding Configuration Options

Each section represents a single xTend service which must contain a listener and exporter object except for OS which contains an exporter. By default, xTend is configured so that the OS service exports to the Provenance service’s listener via a socket on port 11427 which similarly exports to Aggregation and Sigma-rule-based detection on port 11428. The Sigma (rule-based detection) service is an optional service that can be disabled by excluding it from the config.json file. If the configuration file is changed, the application should be restarted so that the configuration can be reapplied to xTend. Below, more details on the types of supported listeners and exporters and configurations of each of these options are provided.

7.2.1. Listener Settings

The “listener” object in the configuration is used for the Aggregation, Provenance and Sigma services and not the OS service. The “listener” object can use the following configurations:

1. File Overwrite: Reading data from a file.

{
  "listener": {
    "type": "file_overwrite",
    "args": {
       "filename": "filename"
    }
}

Note: The filename is a path relative to the executable.

2. Socket: Read data from a socket.

{
  "listener": {
    "type": "socket",
     "args": {
      "port": 1123
     }
  }
}

Note: If the port is in use, the program will not run; the default port used is 11427.

7.2.2. Exporter Settings

The “exporter” object in the configuration is used for all xTend services. The “exporter” object can use the following configurations:

1. Socket: Write data to a UDP Socket.

{
   "listener": {
     "type": "socket",
      "args": {
         "port": 1123
     }
   }
}

Note: If the specified port is in use, the program will not run; current default port used is 11427.

2. File Stream: Continuously write to a file in a folder without rotating (file grows infinitely).

{
  "exporter": {
    "type": "file_stream",
    "args": {
      "folderPath": "folderPath"
    }
  }
}

Note: Keep this in mind: “folderPath” and “filename” serve different roles. The “folderPath” points to a specific location for saving the file, which then gets automatically assigned its name.

3. Rotating Logs: Continuously write to a file in folder with rotating logs (logs rotated when one file reaches a certain size).

{
    "exporter" : {
      "type": "logging",
      "args": {
        "maxSizeKB" : 64,
        "maxLogFiles" : 4,
        "fileDirectory" : "../logs",
        "fileExtension" : "json" 
      }
    }
  }

Note: “maxSizeKB” is in KB and “maxLogFiles” will produce 1 + maxLogFiles number of files where one file is where data is initially written to before rotating.

4. Kafka: Write data to a Kafka server.

{
  "exporter": {
    "type": "kafka",
    "args": {
      "bootstrapServer": "localhost:9092",
      "user": "testingUser",
      "password": "testingPassword",
      "topic": "testing"
    }
  }
}

Note: “user” and “password” are optional; and if at least one is not defined, then localhost server is used as the Kafka server.

7.2.3. Additional Settings

The “additional_config” object in the configuration contains additional options and adjustments for the Services. Currently, this object is used for only the Aggregation config section. The object determines how long the application aggregated data for before logging the aggregated data. The “additional_config” object is in the following format:

{
    "additional_config": {
      "aggregation_time": 0.1
}

Note: The aggregation time is in seconds.