
xTend for macOS
Getting Started
1. Getting Started with Ennetix xTend
Ennetix xTend is available through Apple’s mac App Store. This document walks you through getting it configured the first time you run it.
In the end, we show how you can increase Ennetix xTend’s value by also adding the free Ennetix Extend application to your mac.
1.1. The first thing you see
When you run Ennetix xTend the first time, two windows pop up: the main xTend window and the “Initial Install Agent” window. When xTend starts, it tries to connect to its network agent. Because this is the first time you are running it, xTend won’t find the agent, so it will open a window to prompt you to install it. Click the “Install” button.
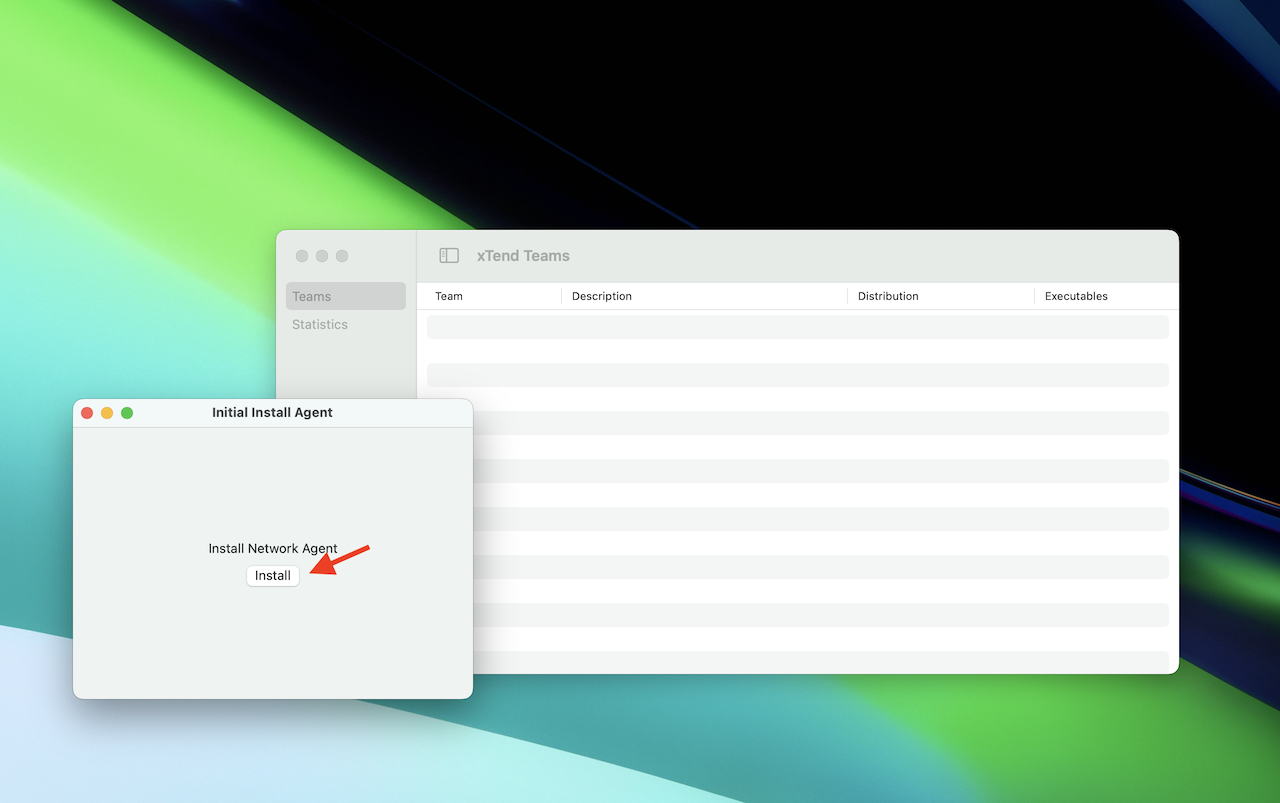
Figure 1: Click “Install” to install xTend’s network agent.
Your mac will pop up another window telling you that it blocked the installation process and that you must enable it. Click the “Open System Settings” button.
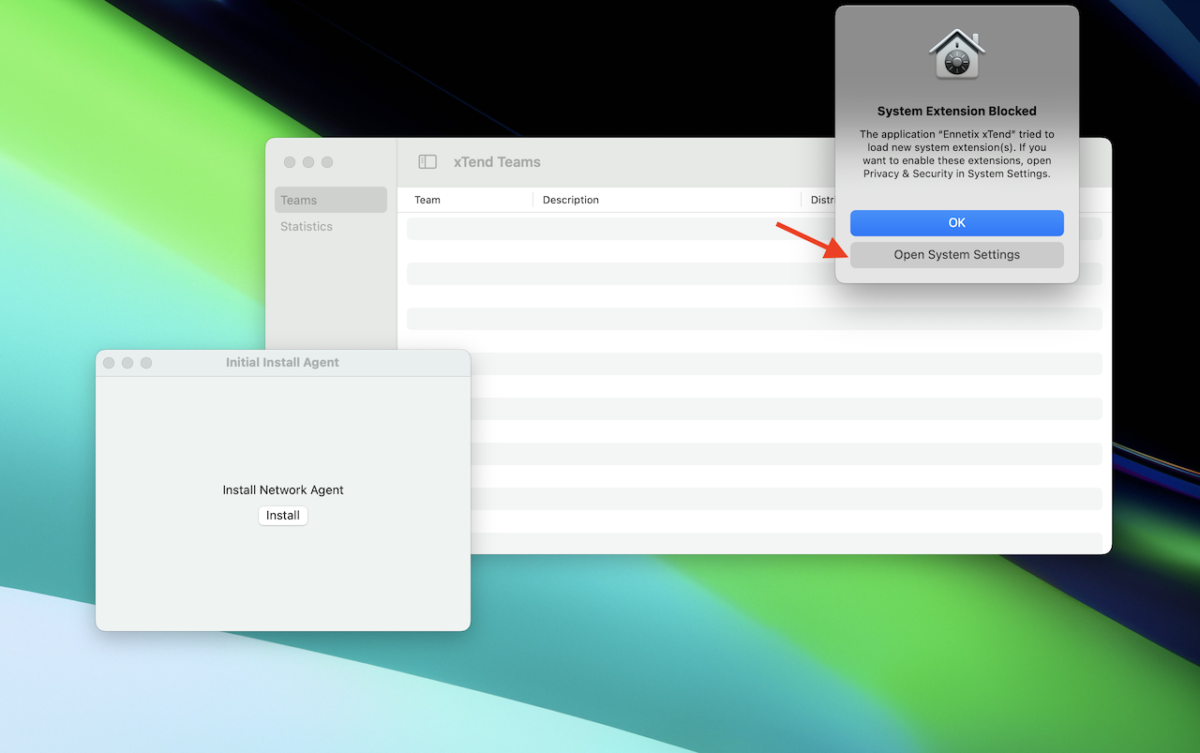
Figure 2: Click “Open System Settings”.
The System Settings app will start, and it should take you to the exact location to allow the network agent to be installed. However, if you need to find this spot in System Settings, select “Privacy & Security” in the left pane (1). In the right pane, scroll to the Security section. You should see the prompt about the Ennetix xTend software being blocked (2).
Click the “Allow” button (3). (If you don’t see the prompt to “Allow” “Ennetix xTend”, see the troubleshooting section “below”).

Figure 3: Click the “Allow” button.
Next, your mac pops up another window asking you whether to allow Ennetix xTend to filter network content. xTend does not block any network traffic. xTend only uses Apple’s filtering service to observe what network connections are occurring.
Click the “Allow” button.
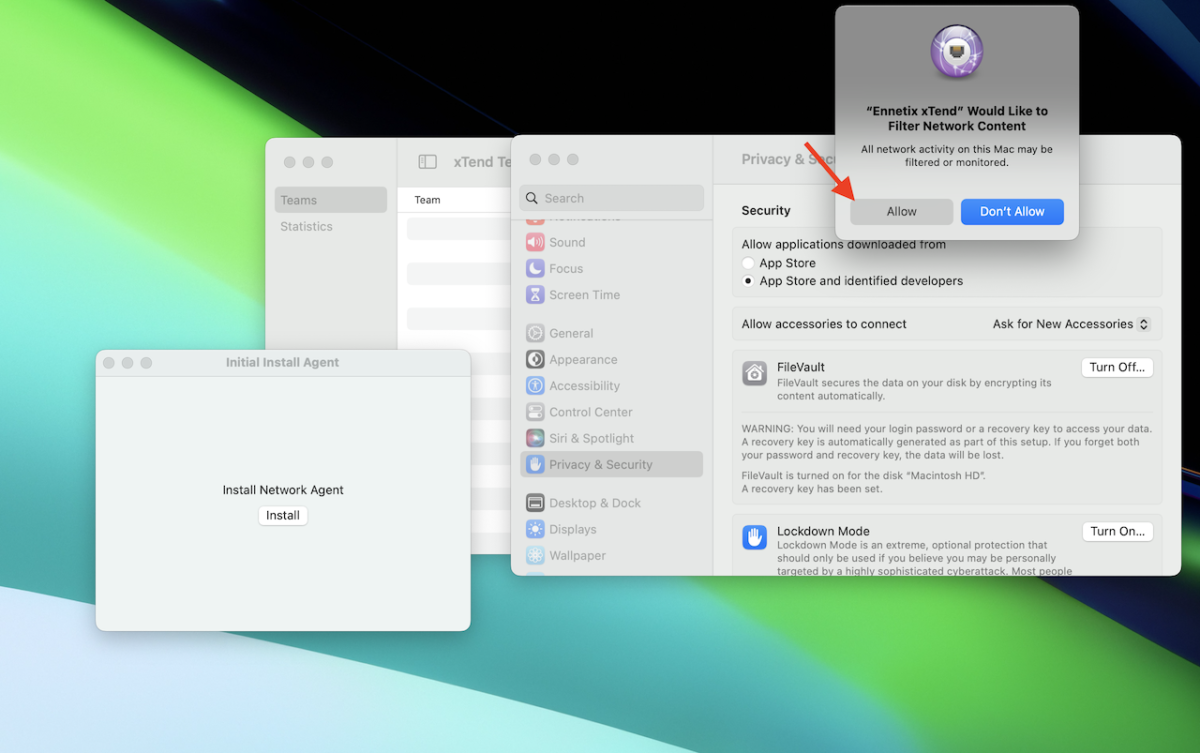
Figure 4: Click the “Allow” button.
Congratulations! xTend can now display your network traffic. The “Traffic” tab will appear in the navigation column in the main window. You can close the “Initial Install Agent” window.
The basic version of Ennetix xTend is now running. You should see network traffic information start to appear in the xTend’s Traffic tab.
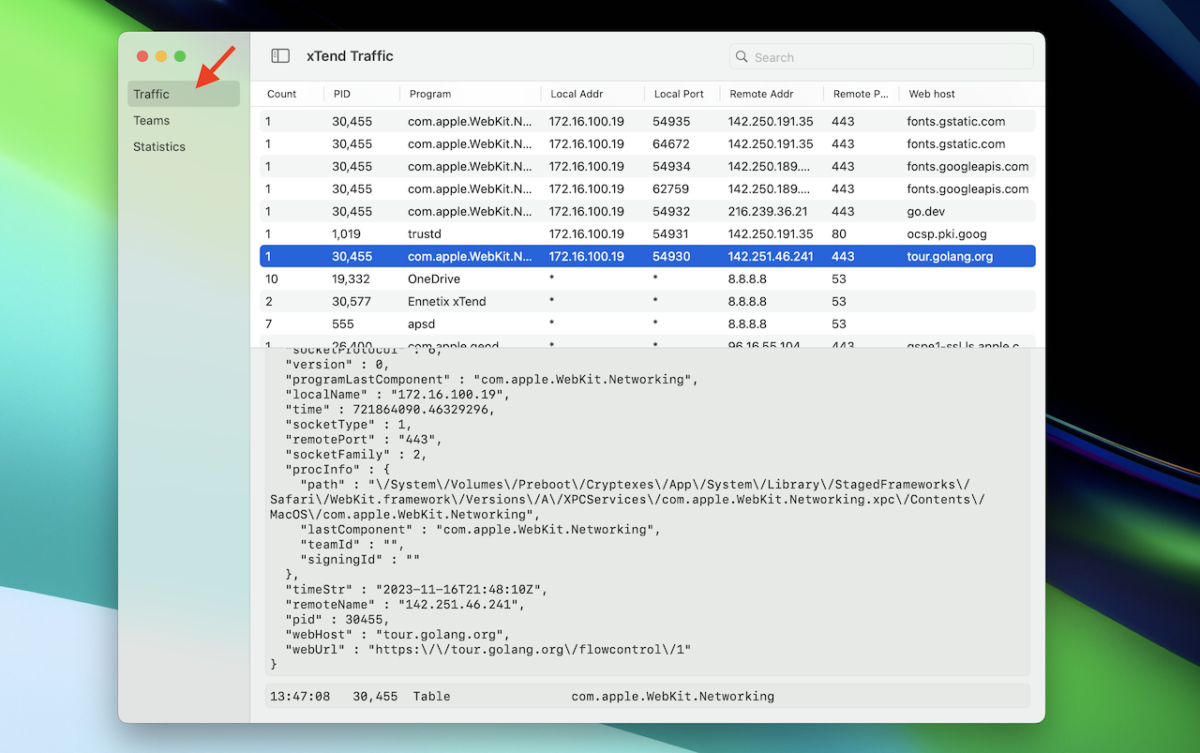
Figure 5: Click the “Traffic” tab to watch your network traffic.
1.2. Gain additional capabilities for xTend
To unlock even more functionality from xTend, install the Ennetix Endpoint application on your mac link. (Apple’s App Store policies require us to distribute the endpoint agent outside the Mac App Store.)
1.3. Troubleshooting
Hopefully, the installation process went smoothly, but here are some suggestions if you run into trouble.
• If you accidentally closed the “Initial Install Agent” window before clicking the “Install” button, simply quit xTend and restart it. xTend will be in your Applications folder under the name “Ennetix xTend”.
• If you accidentally clicked the “OK” button instead of the “Open System Settings” button, just open “System Settings…” from the Apple menu. Then, in the left pane, select “Privacy & Security”, and then scroll down to the Security section in the right pane.
• If you accidentally clicked “Don’t Allow” in the window asking whether to allow Ennetix xTend to filter your traffic, you will need to uninstall the network agent, quit xTend, and restart “Ennetix xTend”. You should be guided through the same process as before. To uninstall the network agent, select the menu item Window > Uninstall Agent. The “Uninstall Agent” windows will appear. Click the “Remove” button.
• If you don’t see the “Allow” button for “Ennetix xTend” in System Settings, it may be due to several other system extensions waiting to be installed (see figure below). In this case, click the “Details” button, and a new window with a list of system extensions will pop up, find Ennetix xTend in that list, and slide the button to the enabled position.
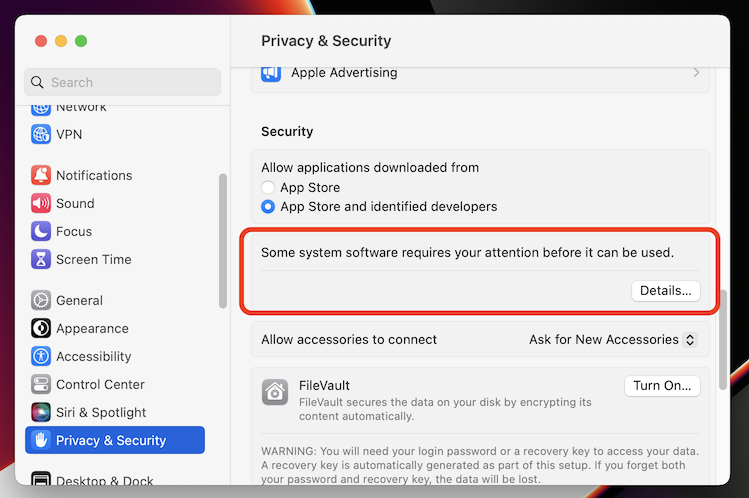
Figure 6: When multiple system extensions (not just Ennetix xTend) are pending, this is the view you will see. Click the “Details” button.
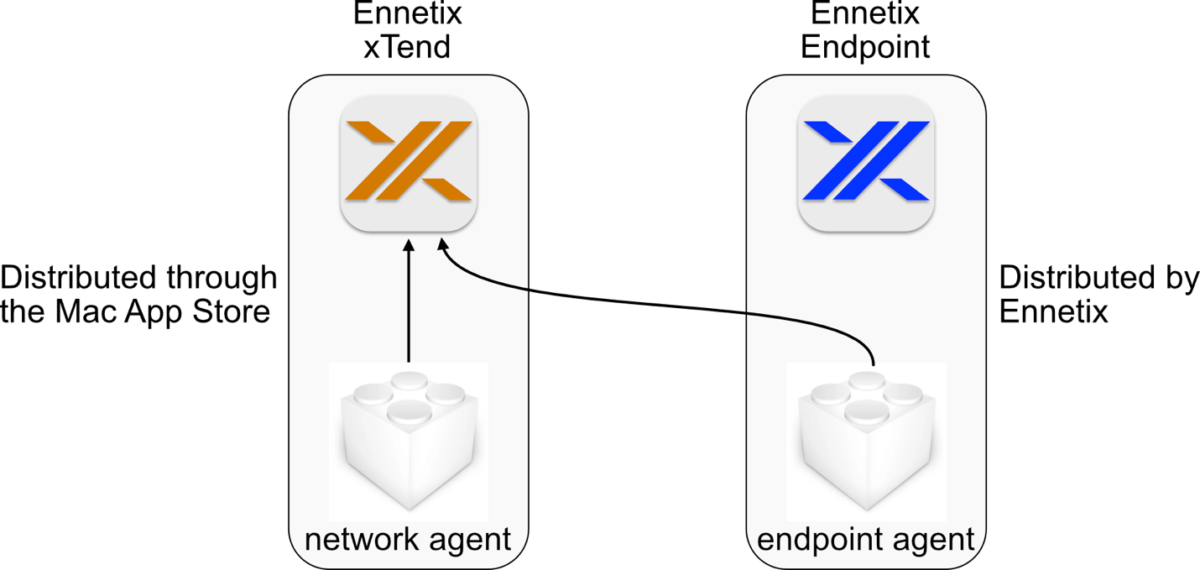
Figure 7: Two Ennetix programs, one experience.
Due to Apple’s App Store policies, Ennetix is required to distribute the program that installs the endpoint agent outside the mac App Store. This content is about installing the Ennetix Endpoint application.
For information about installing the test version of Ennetix xTend, see “Getting Started with xTend”.
This document walks you through:
- downloading and running the Ennetix Endpoint installer package
- Installing the endpoint agent
- troubleshooting
2.1. Download the installer
The current version of the Ennetix Endpoint installer package can be downloaded by clicking the following link:
https://xvisor.blob.core.windows.net/public/xtend/mac/EnnetixEndpointInstaller_1.0.1.pkg
Your web browser should download the installer into your Downloads folder.
Double-click the installer package (the icon is a small brown box that is opened). The installer should start. Follow the instructions, and Ennetix Endpoint will be installed in your Applications folder.

Figure 8: Running the installer package.
2.2. Installing the endpoint agent
Open the Applications folder on your mac, and find the Ennetix Endpoint application. The icon is a blue ‘X’, and double-click the icon to run the Ennetix Endpoint application.
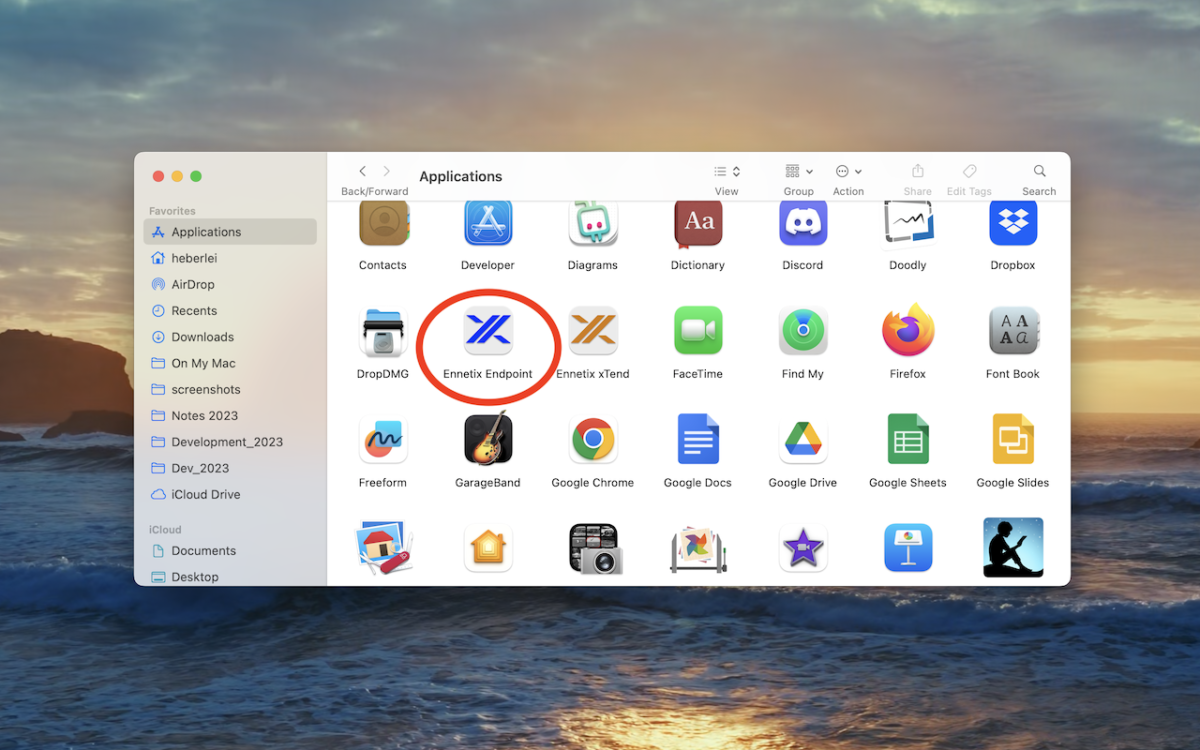
Figure 9: Double click on “Ennetix Endpoint” – the blue ‘X’.
The Ennetix Endpoint has one purpose – to install an endpoint agent.
In the initial window, click the “Install” button.

Figure 10: Click “Install” to install the endpoint agent.
Your mac will open a window stating that the installation of the network agent was blocked.
Click the “Open System Settings” button.
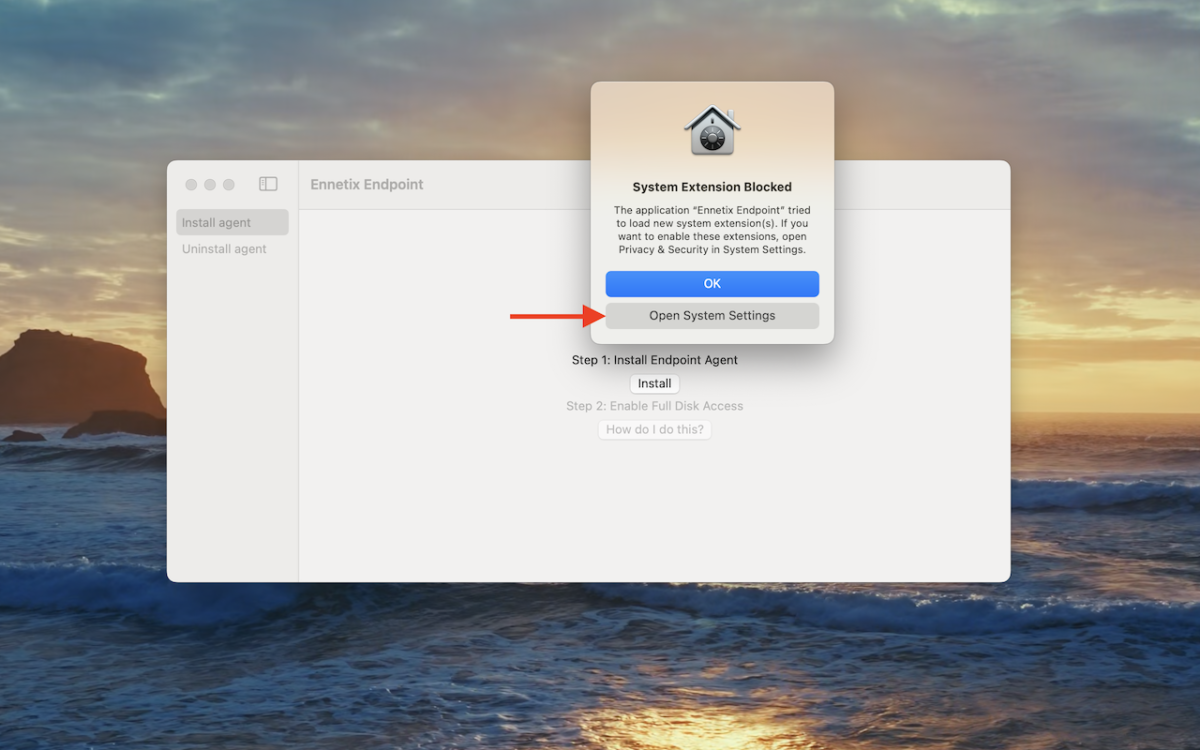
Figure 11: Click “Open System Settings”.
The System Settings window will open with “Privacy & Security” selected in the left pane (1) and the security section in the right pane. Identify the section stating that Ennetix Endpoint was blocked (2), and click the “Allow” button (3). (If you don’t see the prompt to “Allow” “Ennetix Endpoint”, see the troubleshooting section “below”).
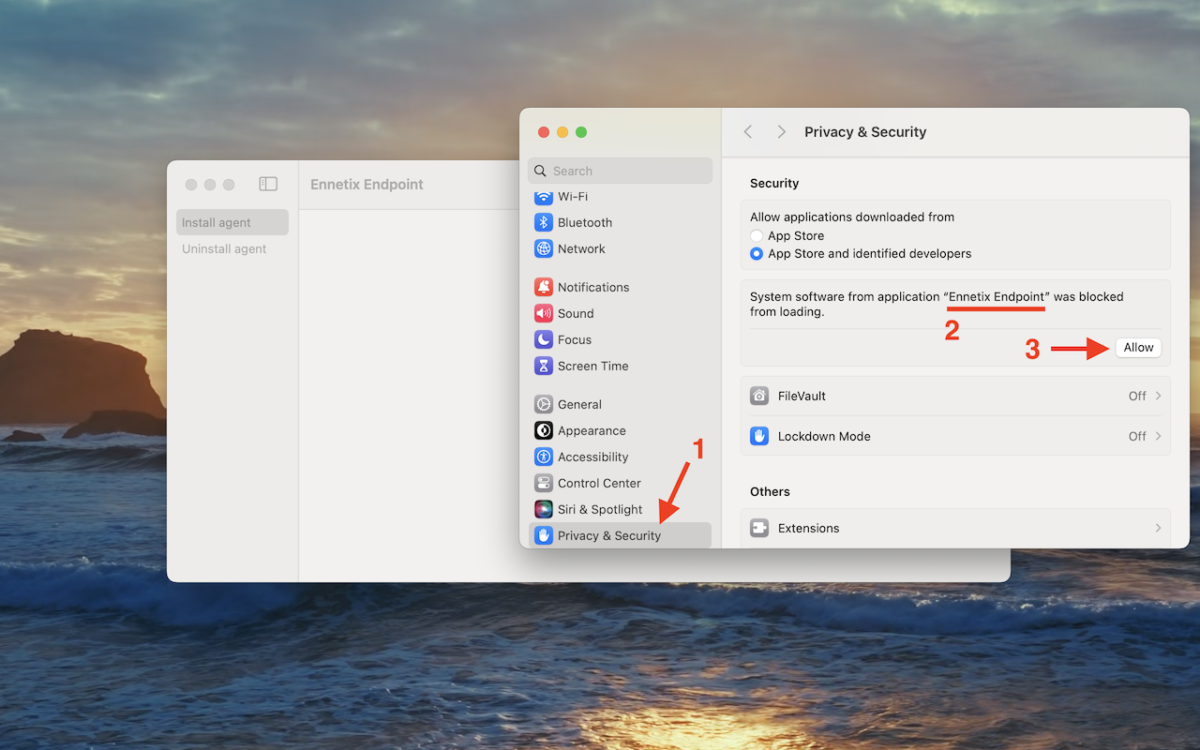
Figure 12: Click the “Allow” button.
Remaining in the “Privacy & Security” section, scroll up to the “Full Disk Access” group, and click it.
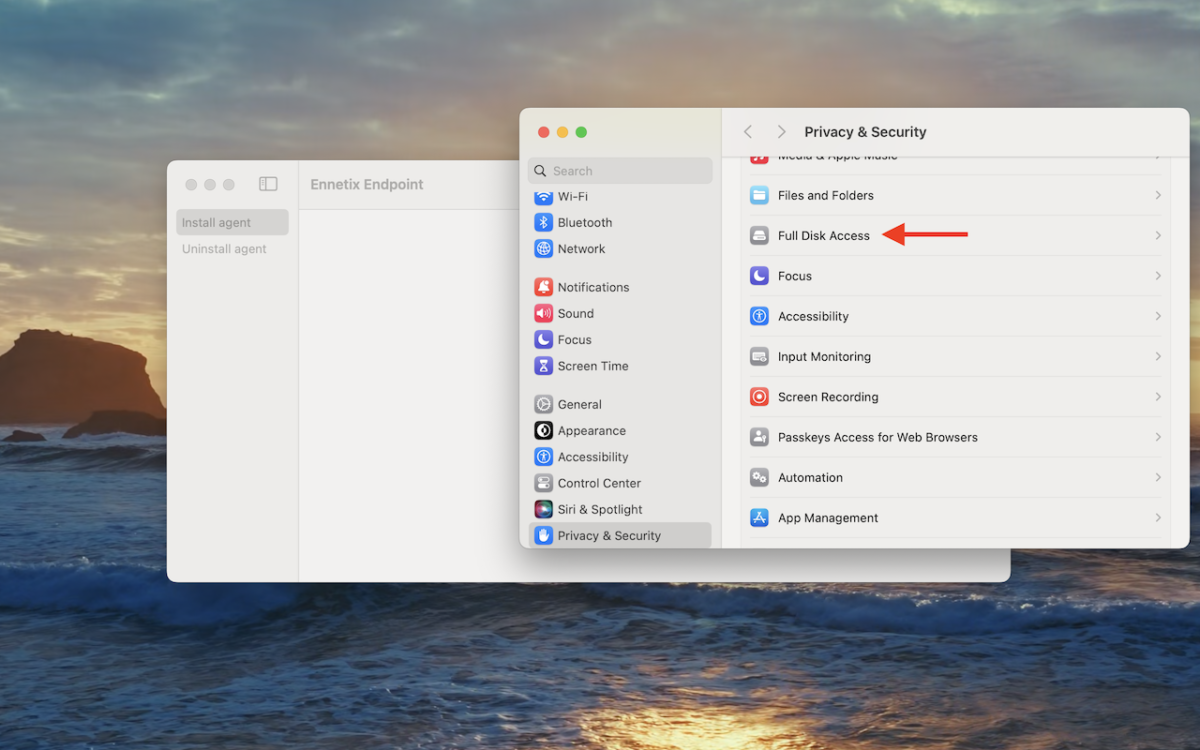
Figure 13: Click “Full Disk Access.
Find the entry for “Ennetix Endpoint Agent” and turn the switch to the enabled position.
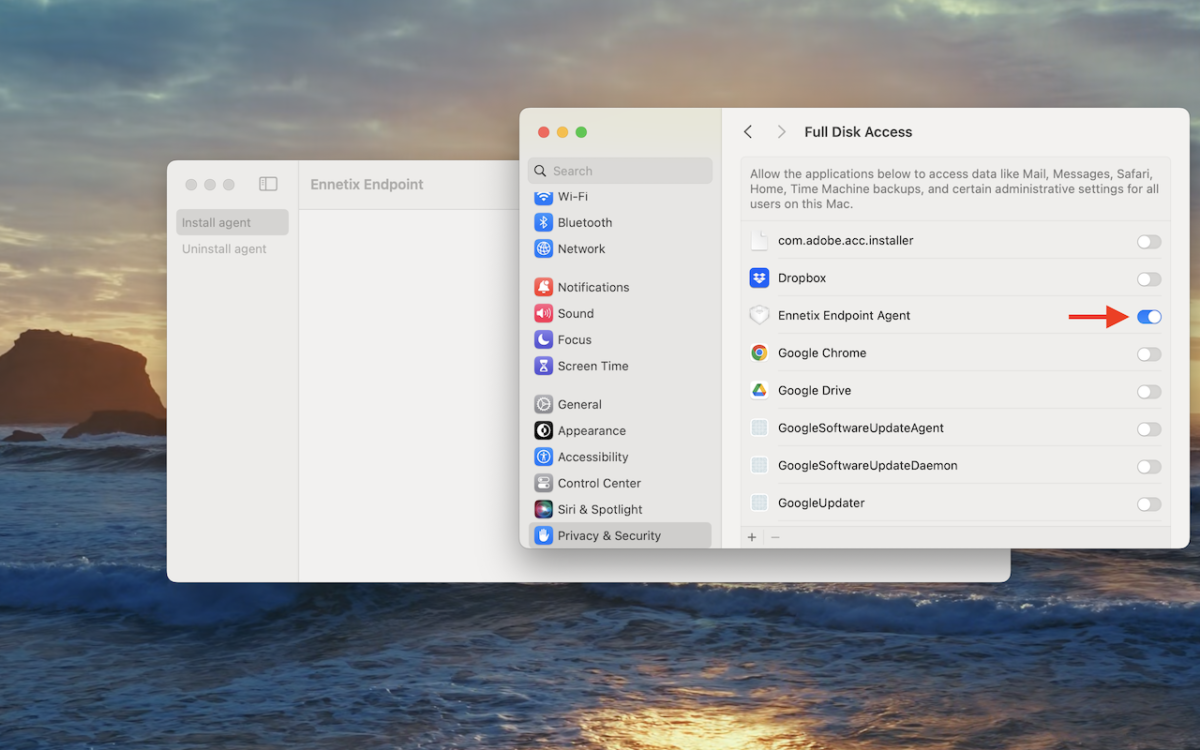
Figure 14: Enable “Ennetix Endpoint Agent”.
Congratulations! The endpoint agent is now installed and active.
You can now quit both Apple’s System Extension program and the Ennetix Endpoint program.
If the “Ennetix xTend” application is running (the app with the orange ‘X’), quit it and restart it. If xTend is not running, start it now. You should see three new tabs with new information.
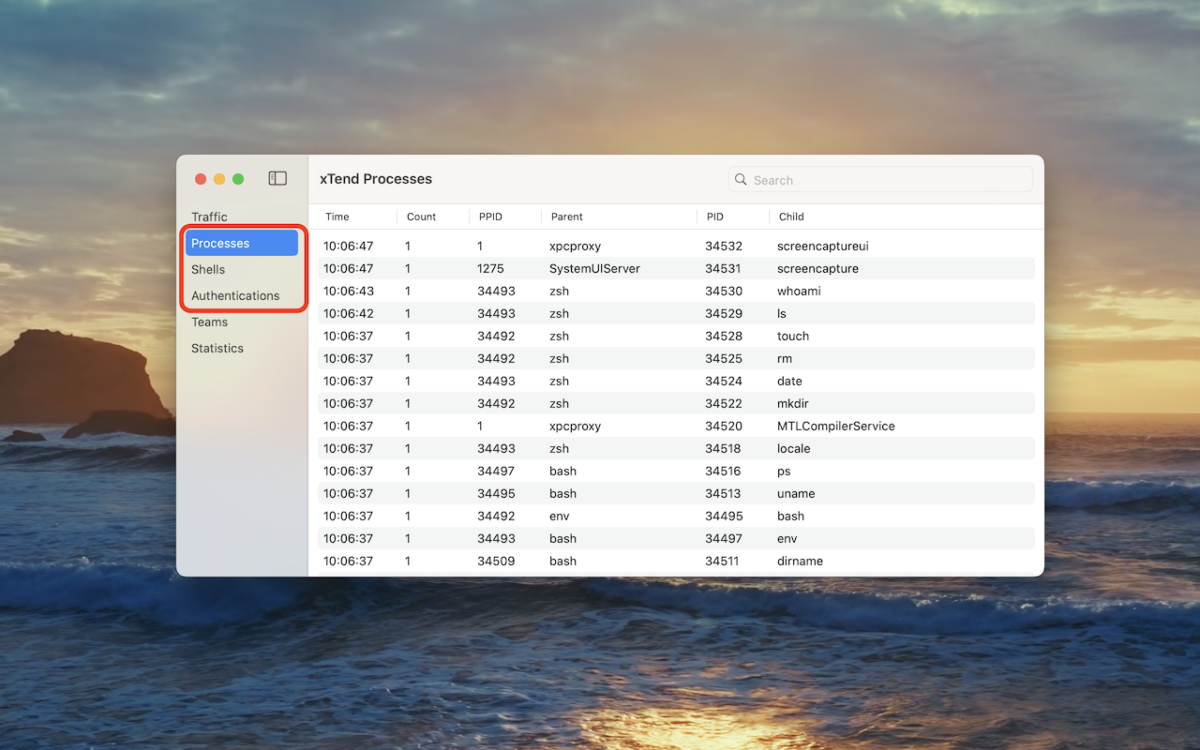
Figure 15: xTend’s new capabilities.
2.3. Troubleshooting
- If you accidentally clicked the “OK” button instead of the “Open System Settings” button, just open “System Settings…” from the Apple menu. Then, in the left pane, select “Privacy & Security”, and then scroll down to the Security section in the right pane.
- If you don’t see the “Allow” button for “Ennetix Endpoint” in System Settings, it may be due to several other system extensions waiting to be installed (see figure below). In this case, click the “Details” button and a new window with a list of system extensions will pop up, find Ennetix Endpoint in that list, and slide the button to the enabled position.
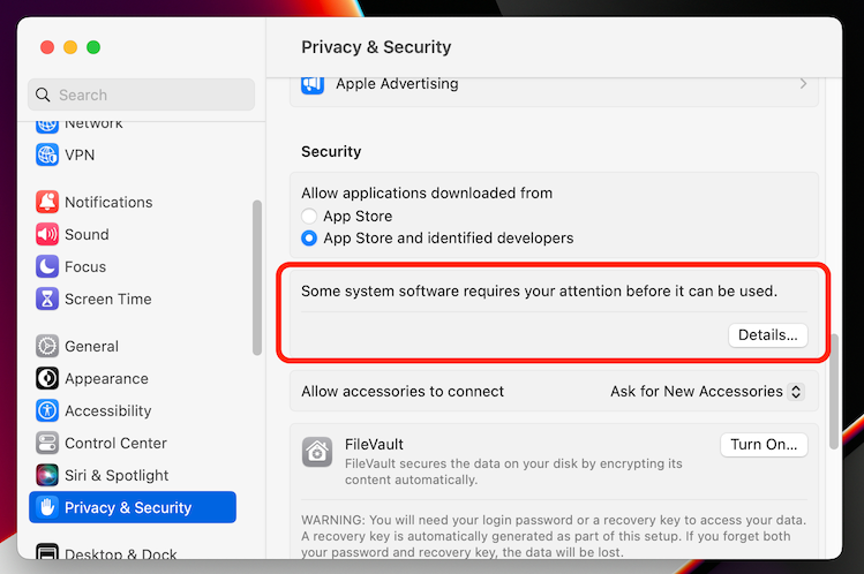
Figure 16: When multiple system extensions (not just Ennetix Endpoint) are pending, this is the view you will see. Click the “Details” button.